Recently I noticed how often I was refilling the napkin holder in the center of our dining room table. It seemed like we were going through the package pretty quickly, and then I thought about cloth napkins. Since each one is just a square of fabric, they're super simple to make.
Cloth napkins can either be homey or fancy. When I was a kid, my mom went back to work full time when I was about 7 years old. At that point, I started going over to a neighbor's house each weekday morning. I ate breakfast with my friend and her sisters before their mom got all of us on the school bus together. This was the early 1980's, and I remember her homemade cloth napkins. They were a glorious 1970's brown pattern. The brown might not be such a pretty color, but they did hide food stains, and the cotton washed up easily.
Brown's not really my color, but I did have some pretty citrus-printed fabric in my stash that seemed perfect for the task. It was seriously easy to sew up a set, and we use them at least once a week. Doing a partial load of laundry several times a week isn't really any more efficient than going through all those paper napkins, so I'm expanding our collection to help us get through more of the week before we need to do the wash. These come together easily, and you'll have a whole set created in no time!
How to make cloth napkins with fat quarters:
You'll Need:
-Cotton fat quarters (one for each napkin), pressed to remove any creases
-Typical sewing notions: scissors or rotary blade, cutting mat, ruler, fabric pen or chalk, etc.
1: Lay out your fat quarters and cut each one down to an 18" square.

2: Measure ½ inch in from each long edge, and again 1 inch in. Measure edge to edge so the lines cross over each other at the corners. You'll end up with some little boxes drawn at each corner.
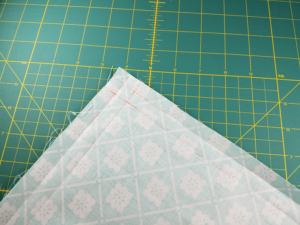
3: Line your ruler up to bisect the squares at the corners, and mark as shown. Cut along this new line so you're nipping a triangle off each corner. As you can see, you'll be cutting off one full "box" and bisecting the two next to it.

4. Fold the fabric down at the corner, aligning your new blunted corners with the marked 1-inch line. Finger press that fold. You can use an iron if you want, but I find that finger pressing 100% cotton makes a good enough edge for me to use for marking.

5. Open it back up and mark the line of that fold from ½-inch line to ½-inch line. Below you can see it after I've folded the fabric right sides together on the diagonal, to bisect that dotted line. Repeat these steps for each of the other corners. Stitch on that dashed line, making sure to lock in your stitches. (Picture at right.) Repeat for the remaining corners.
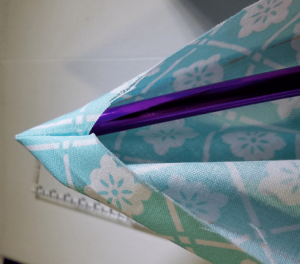
6. Use a point turner, such as my super fancy knitting needle, to make your pointed corners. It's a little difficult to show with such a light fabric, but on the photo on the right, you can see that I've spread out the now mitered fabric corner like a little pocket so it will fill the area between the two sides. This will keep it from bunching up in the next steps and will press flat, making for more even hems when you stitch it down.

7. Here's where I DO use my iron. Press those corners, then press along the 1-inch line down each side. Fold the flaps under so the edge of your fabric meets the fold you just pressed. Press again. Now your unfinished edges are folded under.


8. Stitch all around the napkin, with a maximum of a ¼-inch seam allowance. Your unfinished edges are now hidden inside the seams.
There it is! Wasn't it easy? Now go whip up a bunch more!